Lab: Getting to Know Eclipse and Java
In this lab, you will learn the basics of using Eclipse and you will write your first Java program.
As you can see from the table of contents above, there are three main parts to the lab. In the first part, you will learn some Eclipse basics, including how to create an Eclipse project "from scratch". Fortunately (because, as you will see, creating a project from scratch requires many painfully boring steps), in the second part you will learn how copying the Project Template provided for you simplifies your life; this part includes your first simple programming assignment. In the third part, you will learn how to submit course projects.
It is very important that you follow the instructions carefully and pay attention to the details. Make sure you do not skip any steps and that you type all inputs exactly as they are provided in this guide (including spelling and capitalization).
Eclipse Basics
Start Eclipse. Once you completed the previous lab activity, your Eclipse window should look something like the following.

The Eclipse window is always organized according to a perspective. The current perspective determines the panels (views and editors) that are displayed in the Eclipse window. The default perspective when Eclipse is started for the first time is called the Java perspective which is where you will do a lot of your programming work for this class. For now, just take a look around the current window: note the menu bar at the top with a variety of menus (File, Edit, Help, etc.), the toolbar below it, and the various panels in the Java perspective (Package Explorer, Problems/Javadoc/Declaration, etc.). The big blank area is where the editor will appear when you start editing your Java programs. This is the typical structure of most Eclipse perspectives. We'll learn more about this in the following sections.
Deleting a Project
Before we explore other features of Eclipse, let's delete the sample
project created at the end of the last lab (the one named MyProject ).
If you already deleted it, just move on to the next section.
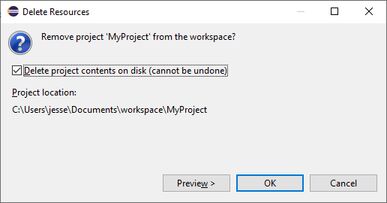
To delete a project in Eclipse all you have to do is to right click the mouse on the project to be deleted in the Package Explorer view and select Delete from the pop-up menu.

Eclipse prompts you to confirm your action. Usually you will want to completely delete the project from the file system, so you should check the Delete project contents on disk (cannot be undone) box and click OK.
Creating a Project (from Scratch)
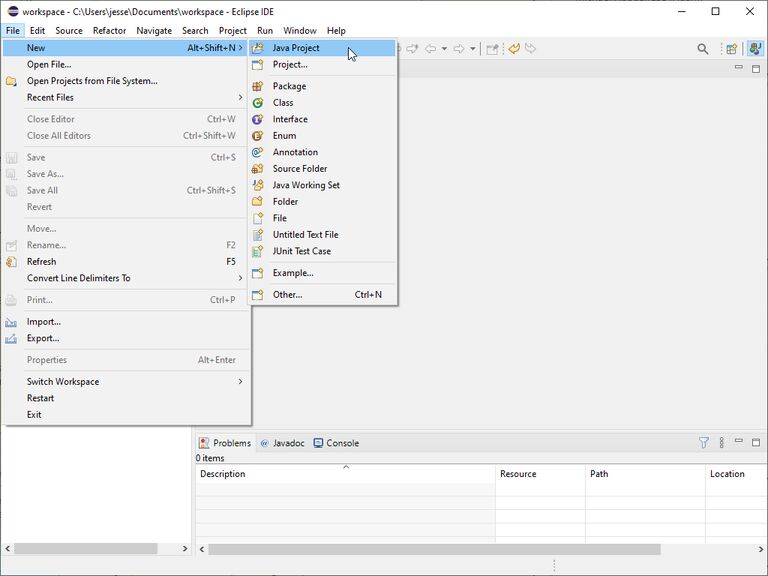
You have already seen how to create a project from a given project template at the end of the previous lab, and that is how you will create new projects for your programming assignments. However, it can be useful and instructive to know how to create a project from scratch in Eclipse. A project is like a folder collecting the files for a given program (or lab assignment). Eclipse supports a variety of different kinds of projects. The first step in creating a new Java program is to create a new Java project. Select File > New > Java Project.
This opens the New Java Project wizard. Enter HelloWorld as the
Project name, and make sure that Use default JRE 'jre' and
workspace compiler preferences is selected in the JRE section, and
the Create module-info.java file checkbox is not set.
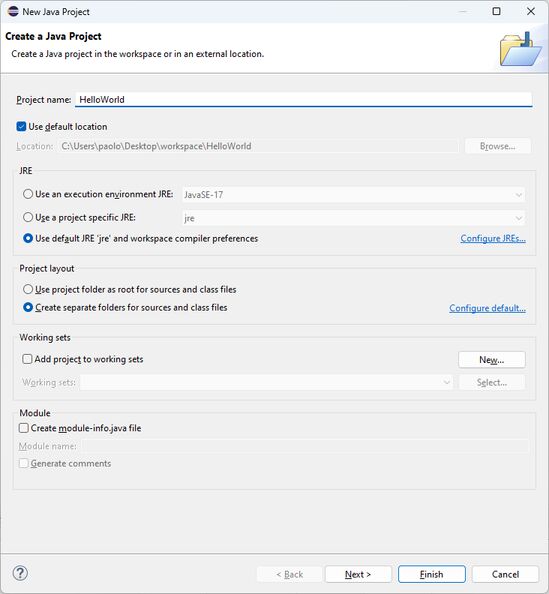
Click Finish to complete the wizard and create the new project. You can see your new project in the Package Explorer view.

Creating a Java Program
Now let's create a new Java program. Select the HelloWorld project in
the Package Explorer view by clicking on it (it is probably already
selected). Then select File > New > Class.

This will open the New Java Class window. Make sure that
HelloWorld/src is displayed in the Source folder box (if something
else appears there, click Browse... next to the Source folder
box to browse to and select folder HelloWorld/src ). Type HelloWorld
in the Name box (we could use a different name from the name of the
project, but in this case the same name will do). Select the checkbox
next to public static void main(String[] args) to make sure a main
program skeleton is created. Finally click Finish.

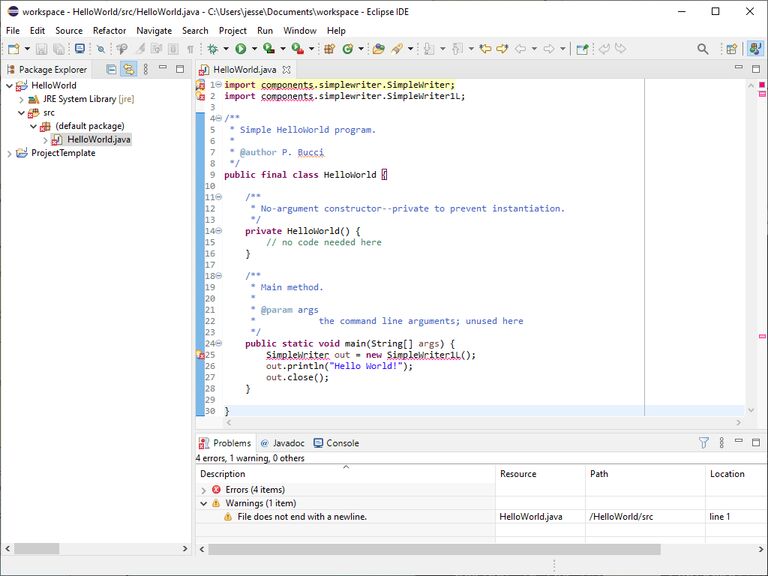
Here is what the Eclipse window will look like, note that the editor panel now displays the skeleton of our new java program.

Activating Checkstyle and SpotBugs
In this course, you will will use two plugins (extensions) in Eclipse that will warn you about issues with your programming style, following recommended coding conventions, and even some potential pitfalls with your code. These plugins are called Checkstyle and SpotBugs and are not activated by default in new projects created from scratch. So let's turn them on.
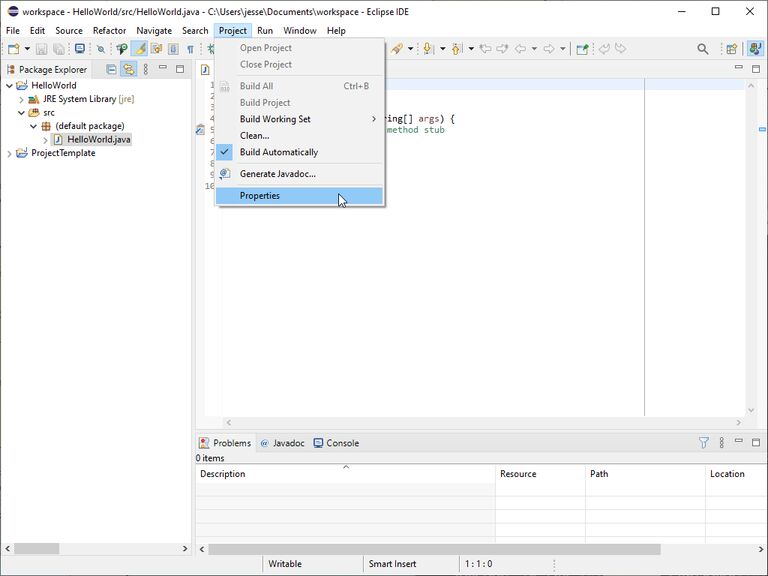
Select the HelloWorld project in the Package Explorer view if it
is not already selected. Then select Project > Properties from the
menu bar.
In the left panel of Properties window, select Checkstyle. In
the right panel, check the checkbox next to Checkstyle active for this
project. Also make sure that OSU CSE is the selected
configuration.

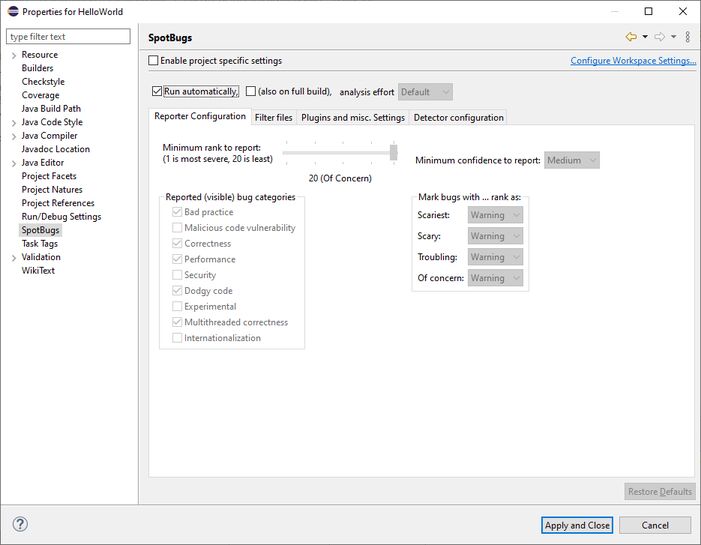
Now select SpotBugs on the left, and check the Run automatically checkbox. Click Apply and Close.
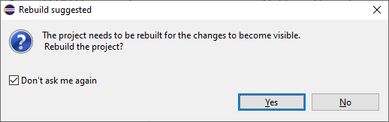
You should see a window asking for confirmation that the project needs to be rebuilt. Check Don't ask me again and click Yes.
In the narrow bar at the left of the editor panel, you should see a
couple of small icons like this  .
These are
warnings generated by Checkstyle and if you hover with the mouse on
either of them, a little pop-up message will tell you what issues
Checkstyle has found.
.
These are
warnings generated by Checkstyle and if you hover with the mouse on
either of them, a little pop-up message will tell you what issues
Checkstyle has found.

For now, you can ignore these warnings. But as you learn more about Java and good programming practices, you will be expected to modify your code to remove all such warnings (and also those generated by the compiler and by SpotBugs).
Editing a Program
Edit the program so that it looks exactly as the following (except for the name of the author which you should change appropriately).
import components.simplewriter.SimpleWriter;
import components.simplewriter.SimpleWriter1L;

/**
 * Simple HelloWorld program.
 *
 * @author P. Bucci
 */
public final class HelloWorld {

    /**
     * No-argument constructor--private to prevent instantiation.
     */
    private HelloWorld() {
        // no code needed here
    }

    /**
     * Main method.
     *
     * @param args
     *            the command line arguments; unused here
     */
    public static void main(String[] args) {
        SimpleWriter out = new SimpleWriter1L();
        out.println("Hello World!");
        out.close();
    }

}
Once you are done typing the program, you will see that there are some
problems in the editor window indicated by red squiggly lines where
issues are found and corresponding icons like this
 editor area (at some point you will also encounter this icon
 which denotes a syntax error). One
convenient feature of Eclipse is that it checks what you type while you
type it, so it can show you any syntactic problems with your code in
real time. If you hover over each of these icons with the mouse, a
pop-up note will tell you what problem the compiler has found. You can
also see a list of all such problems in the Problems view below the
editor area.
which denotes a syntax error). One
convenient feature of Eclipse is that it checks what you type while you
type it, so it can show you any syntactic problems with your code in
real time. If you hover over each of these icons with the mouse, a
pop-up note will tell you what problem the compiler has found. You can
also see a list of all such problems in the Problems view below the
editor area.
In this case, the problems Eclipse is complaining about are that it does
not know what components in the import lines is and what
SimpleWriter and SimpleWriter1L in the main program are. The reason
for this is that these components come from the library of
components provided for this class (we called it OSU_CSE_LIBRARY ),
but we have not told Eclipse to use it in this project.
We'll fix the problems next. Now click on the Save button on the menu bar at the top left of the window to save your program.
Adding a Library to the Build Path
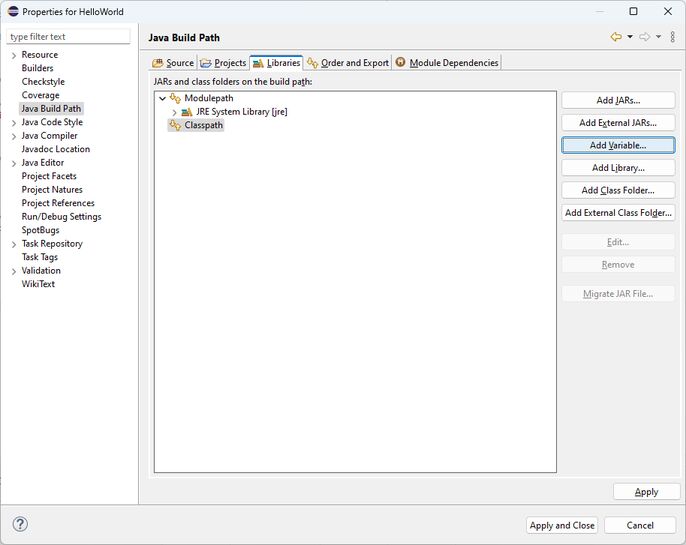
With the HelloWorld project selected in the Package Explorer
panel, select Project > Properties from the menu bar. In the left
panel of the Properties window, select Java Build Path, in the
right panel select the Libraries tab (if it is not already
selected), and select Classpath and click Add Variable....
In the New Variable Classpath Entry window, select OSU_CSE_LIBRARY
(you may need to scroll to the end of the list) and click OK.

The OSU_CSE_LIBRARY has now been added to the build path for this
project, so click Apply and Close to go back to the editor.

The errors should have disappeared. If you happen to still have a warning on the first line of code saying "File does not end with a newline." just go to the last line in the editor and press Enter. Save the program and all warnings and errors should be gone.

If you still have any errors or warnings, try to figure out how your program differs from the one above and fix it accordingly (or call an instructor and ask for help).
Running a Program
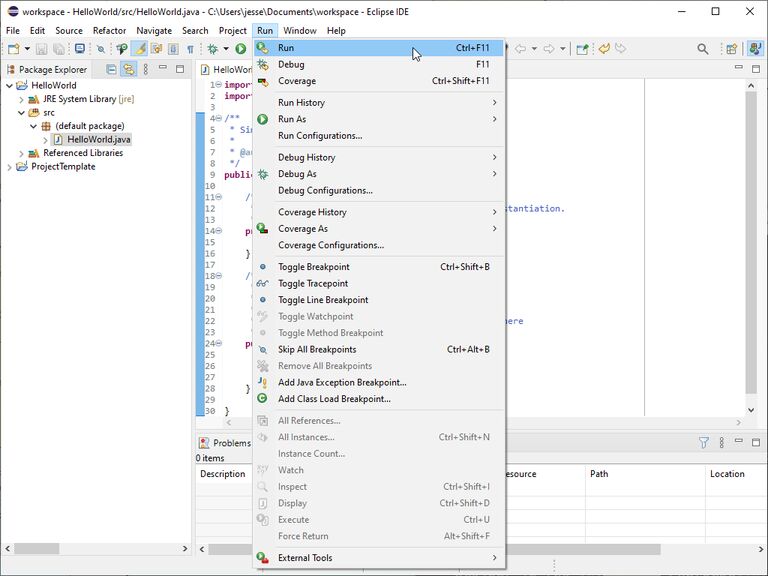
Now it's time to run your first program. To run the program, select Run > Run from the menu bar.
After a short time, the program will start and a new tab labeled Console will appear in the bottom pane. This is the space where you will be able to interact with your program, i.e., this is where the output of the program will be displayed and where you will be expected to type any inputs your program needs. If the Console tab is not the top one, simply click on its name and it will be brought in the foreground.

The program prints Hello World! in the Console and then
terminates. Congratulations! You have just entered, compiled, and
executed your first Java program in Eclipse. Of course, there is a lot
more to learn about the Eclipse environment, but you have already used
the most fundamental features that you will need in this course.
Your First Programming Assignment
Creating a Java project and program from scratch was pretty laborious. Let's see how using the ProjectTemplate project makes things simpler and faster.
In this part of the lab you will create a new Java project from the project template and then modify one of the simple skeletons included in the template to write your first Java program.
Creating a Project from the Project Template
Create a new project by copying and pasting the ProjectTemplate
project and name your new project HelloJack. The detailed instructions
with screen shots can be found
here
and are briefly summarized below.
- In the Package Explorer view, click the right mouse button with
the mouse pointer on the
ProjectTemplateproject entry and select Copy from the pop-up menu. - Click the right mouse button anywhere in the Package Explorer view and select Paste from the pop-up menu.
- Enter the name for your new project and click OK.
Structure of a New Project
Take a minute to explore your new project. If you expand it in the
Package Explorer view, you can see several folders (src, test,
data, doc, and lib) and some libraries (Referenced Libraries,
JRE System Library, and JUnit 4). You will learn about the purpose
and significance of each of these during the semester, but for now, just
expand the src folder which, of course, is meant to contain your Java
source files.
Further expand the (default package) entry to see several Java files:
HelloWorld.java, ProgramSkeleton.java, ProgramWithIO.java, and
ProgramWithIOAndStaticMethod.java. Again, each of these will be
explained later on. Right now open HelloWorld.java in the editor by
double-clicking it in the Package Explorer view. The program looks
pretty much the same as the one you entered earlier, but notice that
there are no syntax errors nor warnings. One of the nice things about
using the project template to create a new project is that it already
has all the right settings needed: the right libraries on the build
path, Checkstyle and SpotBugs are already activated (though you
cannot see that because there are no issues with the Java programs
provided), and there are several folders that will be useful later on.
Anyway, you can close all the open tabs in the editor by clicking on the X on each tab.
Creating a Program from a Skeleton (also Renaming a Java Program)
To create a new Java program you can either start from scratch the way you did earlier in this lab, or you can simply rename one of the given skeletons and start editing that. Let's try the latter.
Open the ProgramWithIO.java file by double-clicking on it in the
Package Explorer view. Take a look at this skeleton. Its structure
should look familiar.
Since you probably have no reason to name your program
ProgramWithIO.java , you should rename it to have a more meaningful
name. In this case, you should rename it HelloJack . This can be
easily accomplished without even editing the file. Remember that in Java
the name of the program (given after public final class) and the
name of the file that contains it must match. In Eclipse, it is easy to
change both at the same time.
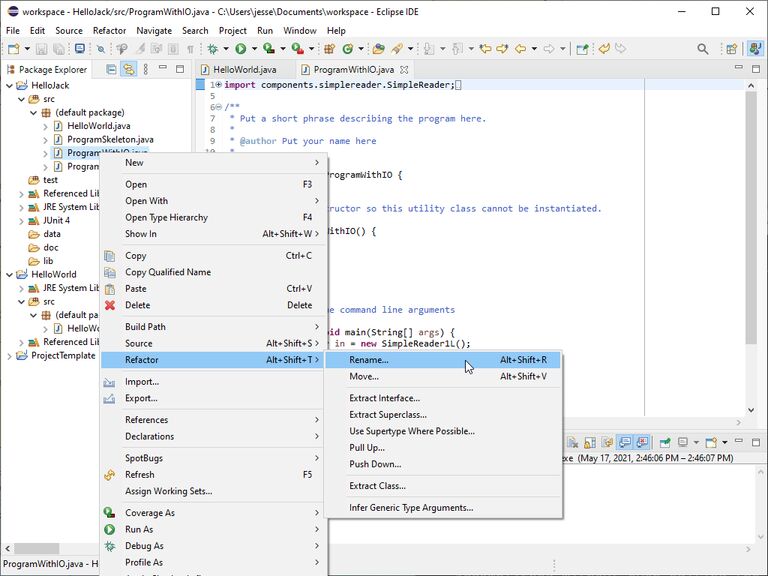
Right-click on the ProgramWithIO.java file in the Package Explorer
view and select Refactor > Rename... in the pop-up menu.
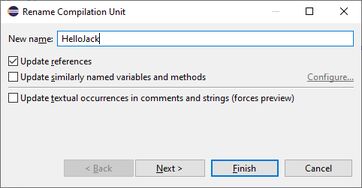
In the Rename Compilation Unit window, enter the New name
HelloJack and click Finish.
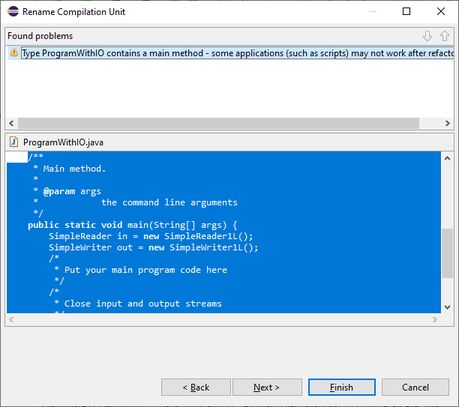
Eclipse will warn you that because you are renaming a main program some applications could break. However, in this case, no application is using this program and there is no danger in changing its name. Click Finish again.
The result is that the file has been renamed HelloJack.java and the
program has been renamed HelloJack correctly and as expected.

Note: once you have chosen the skeleton file to use as a starting point for your own program, you can delete the other files from the project. This is easily accomplished by right-clicking on each file in the Package Explorer view and selecting Delete from the pop-up menu (or you can also simply select the file(s) in the Package Explorer view and press the Delete key on your keyboard).
Your Turn
Finally you get to write some Java. Modify the HelloJack program so
that it prompts the user for his/her name, inputs the name, and outputs
the message Hello, <name> where <name> is the name entered by the
user.
Once you are done, make sure there are no errors, run the program a few times with different inputs to see whether it does what it should and, if not, fix the problems until you get it to work as expected.
Submitting a Course Project
Whenever you need to submit a course project, you will first create a ZIP archive file of your Eclipse project and a PDF "printout" of your code. You will submit these files through Carmen.
Detailed instructions on how to create the ZIP archive of an Eclipse project and how to generate a PDF printout of your Java code are available here.
Final Step: Submitting Your Project
To make sure you understand how to submit your work, create a ZIP
archive file of the project you just completed (the one containing
HelloJack.java) and a PDF printout of HelloJack.java following the
instructions at the link above, and submit that ZIP file and PDF file in
Carmen under the dropbox for this lab.
Please note! This submission is NOT going to be graded. None of your other in-class labs will need to be submitted, either. This submission is just practice so that you know how to submit your projects.